
One Point of Contact, When Needed
The myhosting.com team has you covered. Our cloud experts live and breath what we do and that translates into exceptional support. Whether you need to talk to someone, or browse some of our educational resources, we are always around.
The best part of myhosting.com, is that even when you are working with software from another vendor, you receive our in-house support. Avoid being put on hold and get a real person to talk to fast.
Technology does not solve problems on its own; services are also key. For assistance with the implementation of your cloud-based solutions including technical sales engineering, service desk support, and migration and on-boarding: 1 (866)289-5091.
Professional Services
Migrating from another service? Don’t want to manage the actual migration of your data? Basically, our team can manage everything for you in a timely fashion. We provide an assortment of professional services to get you up and running even faster.
Live Chat
Need to chat with someone right away. Contact a support agent using Live Chat 24/7.
Support Hours
24/7 Toll Free* Phone Support in 60 Seconds
myhosting.com offers 24/7 telephone, chat and email support to all hosting customers.
Support is available in English only.
![]() USA 1-866-289-5091
USA 1-866-289-5091
![]() Canada 1-866-289-5091
Canada 1-866-289-5091
![]() Mexico 55-11689643
Mexico 55-11689643
![]() UK 0-800-680-0676
UK 0-800-680-0676
![]() Australia 1-800-449-670
Australia 1-800-449-670
![]() Germany 0-800-180-1596
Germany 0-800-180-1596
![]() South Africa 0-800-980-888
South Africa 0-800-980-888
![]() Turkey 0-212-414-2607
Turkey 0-212-414-2607
*Numbers are toll free within their regions.
The number for Mexico is a local Mexico City number.
The number for Turkey is a local Istanbul number.
FAQ
How to create an account and add an Office 365 service
To create an account and add Office 365 services, please follow this guide. This guide is for new and existing myhosting clients.
For exisiting myhosting clients, you will need to create a new account with us to proceed.
Currently you must reside in the United States to purchase these offerings.
Retrieving your office 365 admin portal credentials
When you provision Office 365 subscriptions for your users through the myhosting.com Marketplace, you will administer their user profiles and licenses through the admin portal at portal.office.com. You will need the admin login credentials to access the portal. This article contains instructions on retrieving these credentials from your Customer Control Panel.
Note: These steps apply only to retrieving the original password, set by Microsoft when the account is initially created. If the password has ever been changed, you can reset it by using the Can’t access your account? link on the portal login page, or by contacting support.
Follow the steps below to find your end login details.
1) Log in to your Customer Control Panel.
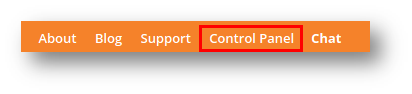
2) Select the Office 365 subscription from the drop-down menu at the top, right-hand side of the page.
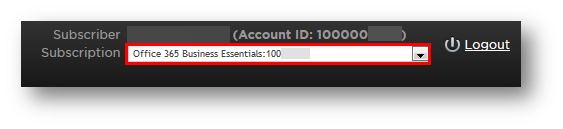
3) Navigate to the Office 365 tab. Here you will see a plan name and product sku for each of your subscriptions.

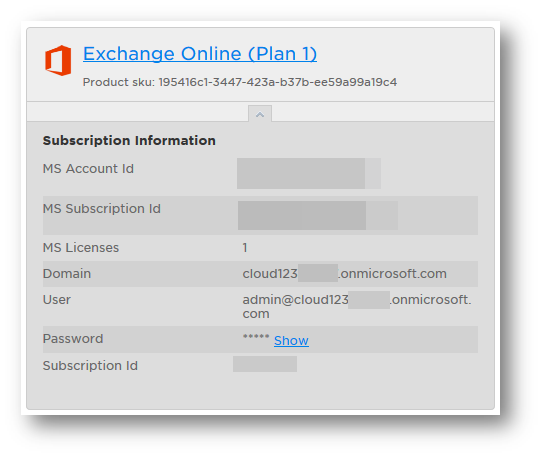
4) Click on the plan name to view the Subscription Information. The login user and password is highlighted in the screenshot below. Click Show next to the asterisks to view the password.
Using these login credentials, you will now be able to access the admin portal at portal.office.com, where you will perform some administrative tasks such as creating end user profiles and assigning Office 365 licenses.
Creating Office 365 User Profiles
In order to assign Office 365 licenses to users, a profile must be created for each Office 365 user. License consumption is managed in the MS Office portal (portal.office.com).
User profiles can be added one at a time or in bulk. Note that the instructions below assume that the subscriptions for Office 365 have already been purchased, or that seats have been added to an existing subscription.
Creating end user profiles one at a time
1) Log in to the MS Office 365 portal at portal.office.com. Your login credentials are found in the Customer Control Panel.
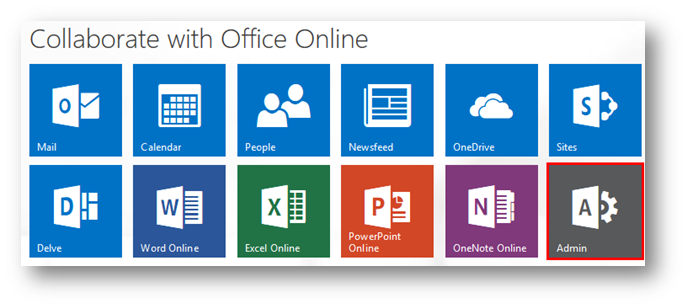
2) Click on the Admin icon.

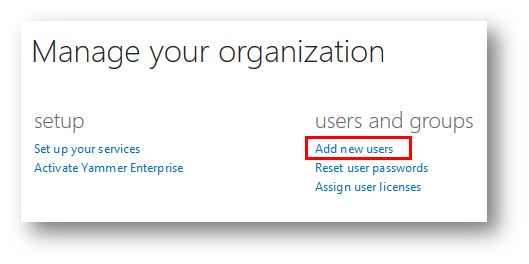
3) Click Add new users under the users and groups section.
4) Enter the new user’s account information. See the screenshot below for more information.
Note: you can assign a license to the user now, or you can create the user profile now and assign a license later.

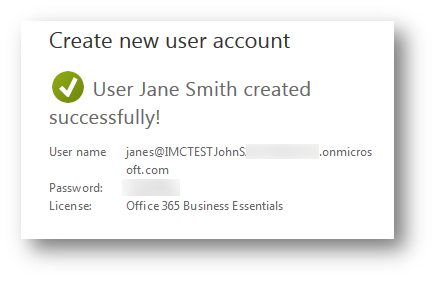
After you provide all of the required information and click Create, you will see a confirmation message like the one below, and the email recipients you specified will receive an email with the password.
Creating end user profiles in bulk
Creating multiple end user profiles in bulk using a CSV file can be an efficient method where many users need to be created at once. Follow the instructions below to create your end user profiles in bulk using this method.
1) Log in to the MS Office 365 portal at portal.office.com. Your login credentials are found in the Customer Control Panel.
2) Click on the Admin icon.
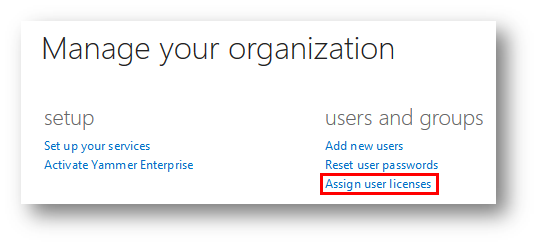
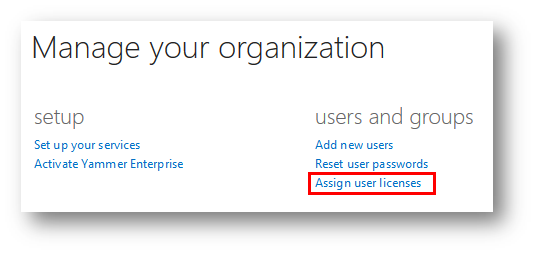
3) Click Assign user licenses under the users and groups heading.
4) Click on the bulk add icon.
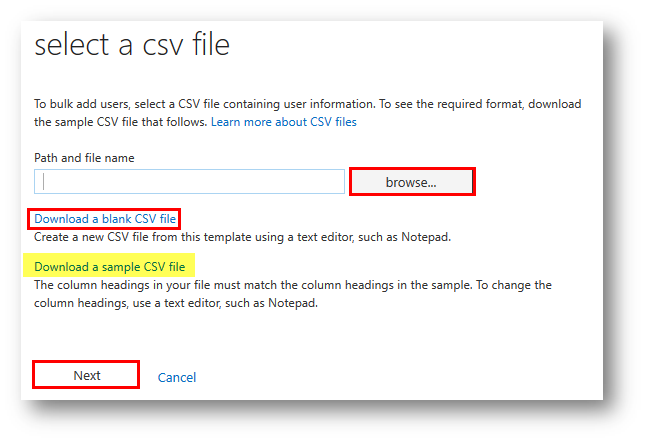
5) Click Download a blank CSV file to download a template that you can fill in with your users’ details using a text editor such as Notepad. If you are unsure how to fill in the CSV template, click Download a sample CSV file to see an example of a completed file.
6) After creating a CSV file that contains all of your users’ details, click Browse to select your CSV file from the location where you saved it. Click Next to upload the file.
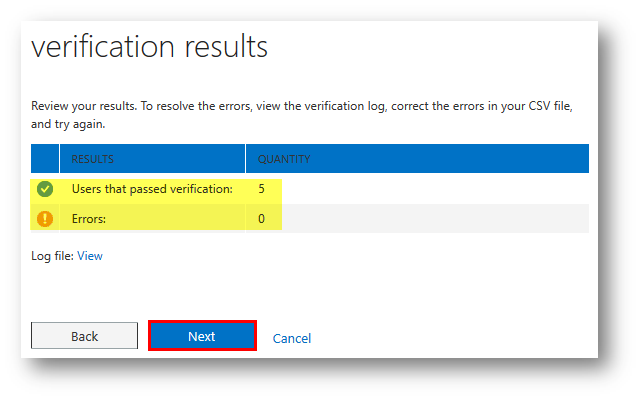
7) On the verification results screen, check for any errors in the CSV file. If there are errors, click on View to see the log file for an explanation of the errors. When you have corrected the errors in the CSV file, click Next.
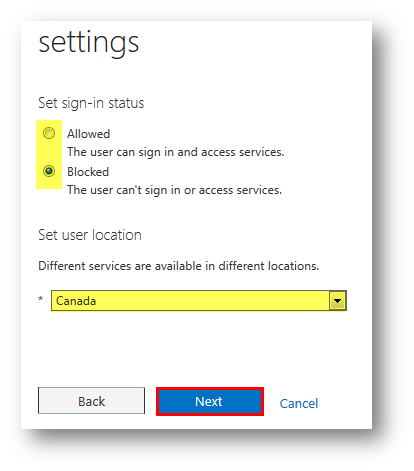
8) Select the required sign-in status and user location, and then click Next. These selections apply to all users; settings for individual users can be edited later.
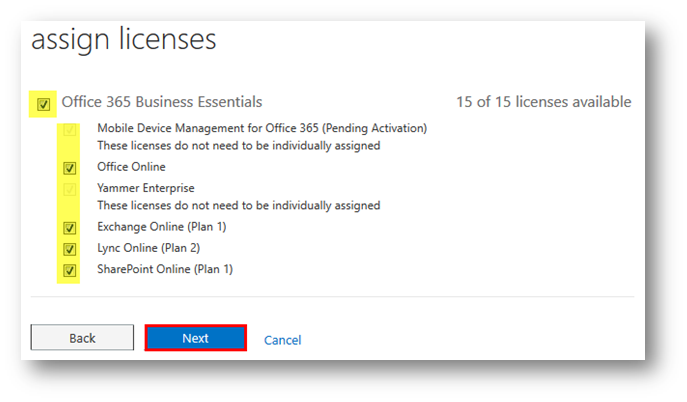
9) On the next screen, you can assign licenses to your users. The list shows how many of each license type you have available to assign. Licenses can also be assigned later.
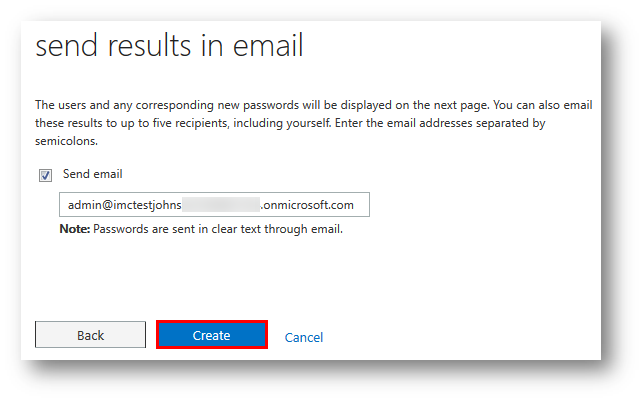
10) Enter up to five email addresses as recipients for the new users’ passwords. The passwords are also displayed in the next step. After entering the email address, click Create.
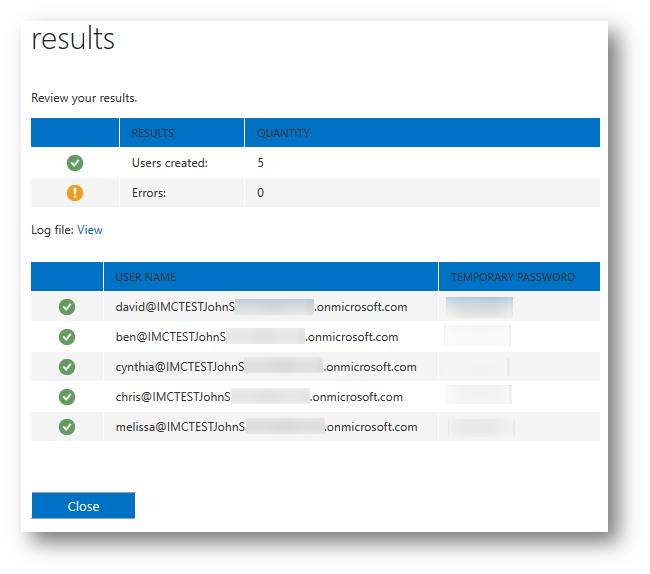
The results page shown below confirms that your new users have been created. If you chose not to have the passwords sent to you by email, be sure to note the temporary passwords displayed.
Managing Office 365 User Profiles
Office 365 user profiles are created and managed in the admin portal. The instructions below demonstrate some of the basic user management functions that can be performed in the admin portal.
To perform the user profile management functions below, you will need to log in to your Office admin portal at portal.office.com. See this article for instructions on viewing your login credentials.
Then you need to navigate to the Active Users view within the portal:
1) Click on the Admin tile.

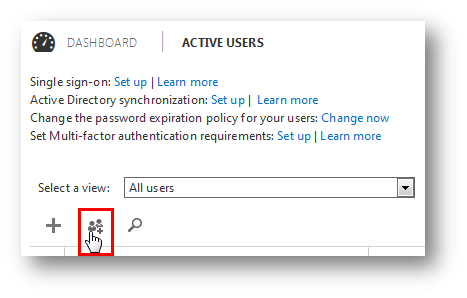
2) In the left-hand-side menu, click USERS and then Active Users.

The list of active user profiles is now displayed. Click on any of the following links for instructions for these user profile management functions:
Searching for User Profiles
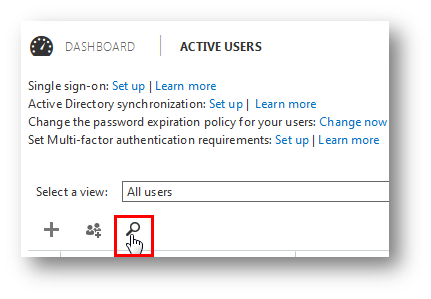
Follow these steps in the admin portal to find the user profile that needs to be managed.
1) In the Active Users view, click the magnifying glass to bring up the search box.
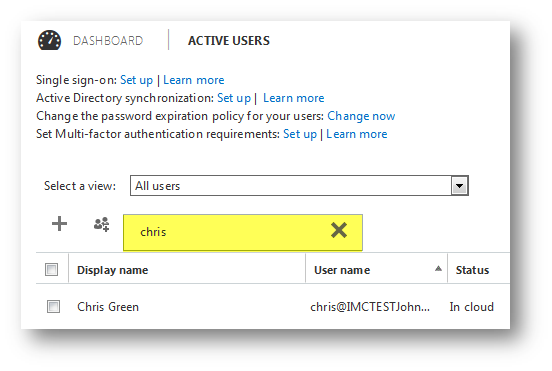
2) In the search field, enter the user’s first or last name. Alternatively, you can search by the first part of the user name (before the @ sign).
3) The list will be filtered to show results containing the name that you entered.
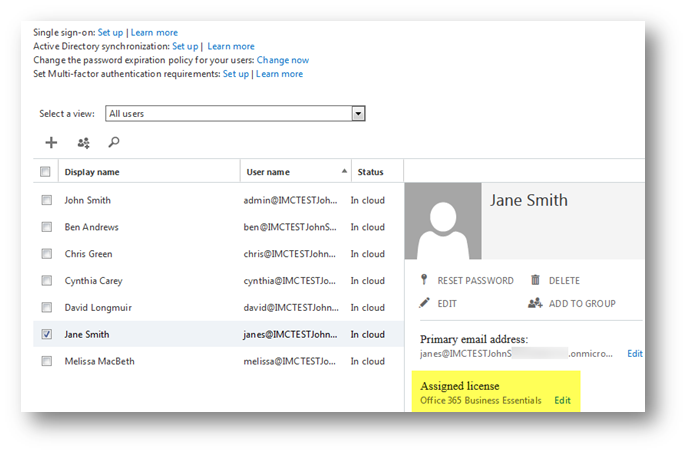
Editing a User Profile
After finding the user(s) you need to edit, select the checkbox next to their Display name. If you select a single user, an account details panel appears on the right-hand side. Click EDIT next to any of the options to change primary email address, assigned license(s) or mailbox permissions.
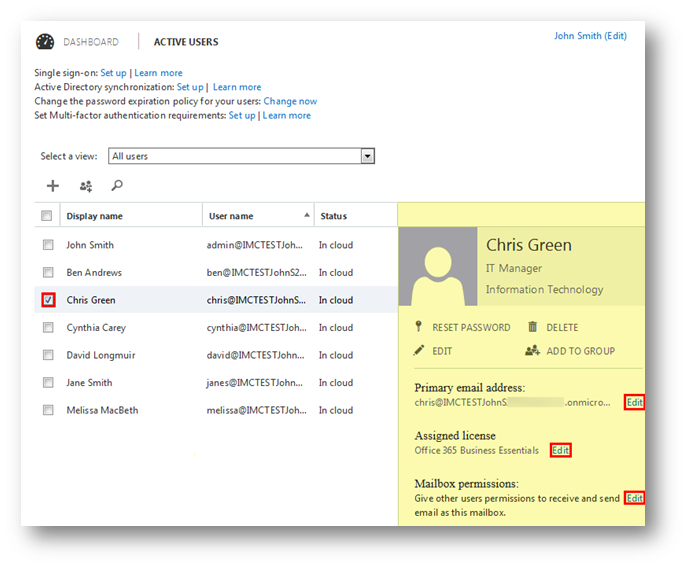
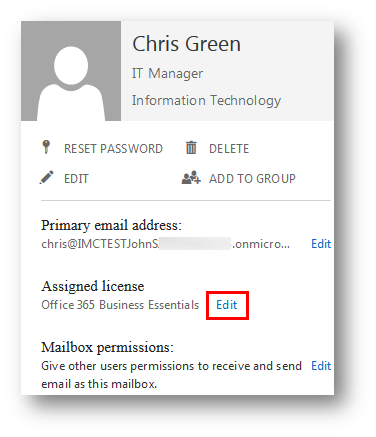
Changing Assigned Licenses
Simply click Edit next to the license name under Assigned licenses in the right-hand-side account panel. A dialogue box will appear with license options where you can change which ones are assigned to this user.
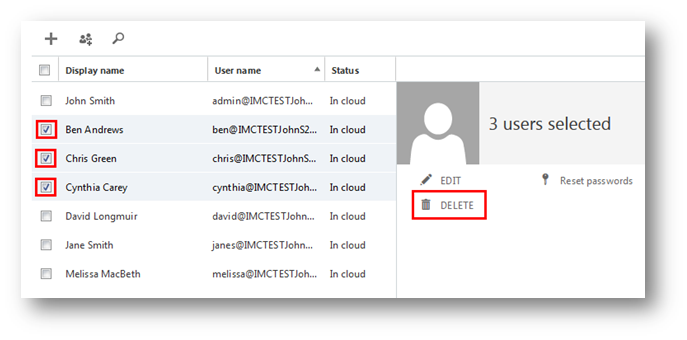
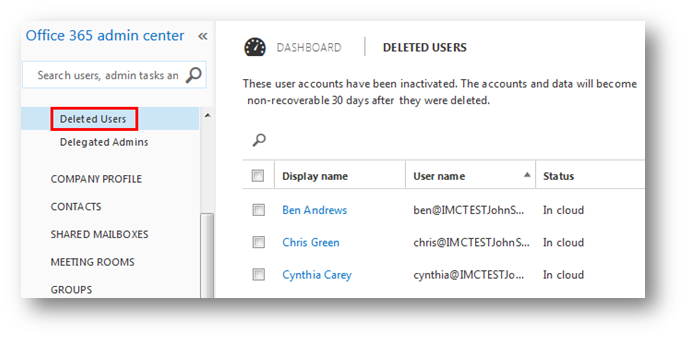
Deleting a user profile
User profiles can be deleted individually or in bulk. In the Active Users view, simply select the checkboxes you need to delete, and click DELETE on the right-hand side.
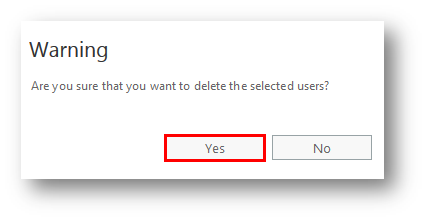
You will see a warning dialogue box; click Yes to confirm deletion.
These user profiles now appear in the Deleted Users list, and the licenses that were assigned to them now become part of the pool of available licenses.
Note that these users can be restored within 30 days. After 30 days, all of their data will become non-recoverable.
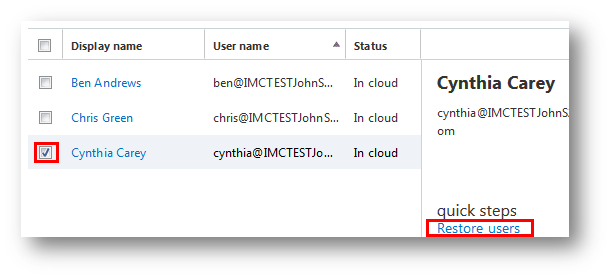
To restore a deleted user profile, select the check box next to their name, and the option to restore the user will appear on the right-hand side.
This completes the set of instructions for some of the basic user profile management functions that can be completed in the admin portal. You should now be able to search for user profiles, edit user profiles, change assigned licenses, and delete and restore profiles.
Adding or changing assigned licenses on Office 365 user profiles
This article explains how to add or change the Office 365 licenses that are assigned to a user profile. It assumes you have already purchased subscriptions and created user profiles for each user.
Follow these steps to assign licenses or change the assigned licenses on Office 365 user profiles.
1) Log in to the customer-level admin portal at portal.office.com.
2) From the Dashboard, click Assign user licenses.
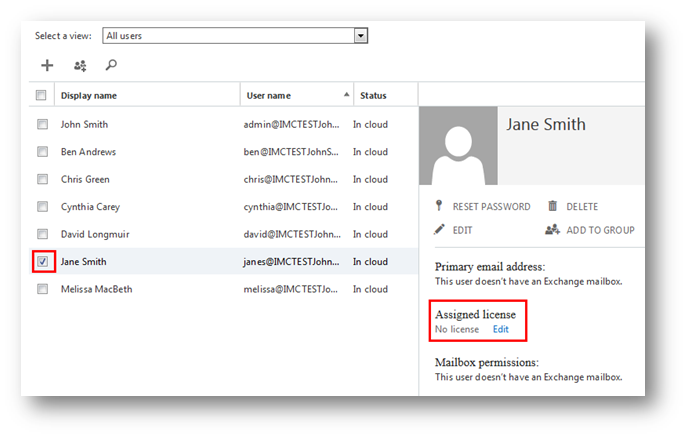
3) Select the checkbox next to the appropriate user(s).
You can either assign licenses to one user at a time, or to many users in bulk. Click the appropriate link here to see instructions for each method. Note that if you change assigned licenses for more than one user at once, all users must be assigned the same license type. If you need to assign different licenses to different users, you will need to do them in separate batches.
Changing licenses assigned to a single user
Follow these steps to change the license(s) that are assigned to a single user.
1) Select the user you want to change. You will see the assigned license information in the user details pane on the right-hand side.
2) Click Edit to change that user’s licenses.
3) The next screen displays how many of each subscription type are available to assign to that user. Select the appropriate license option and click SAVE.
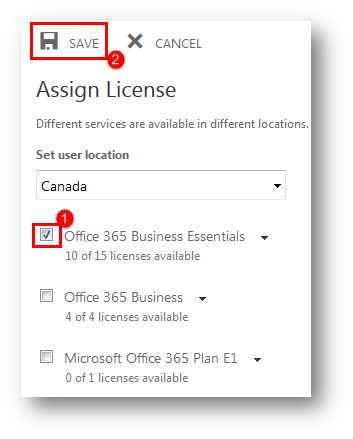
The newly assigned license is now displayed in the user information pane.
Changing licenses assigned to multiple users in bulk
Follow these steps to update multiple users.
1) Select all of the appropriate users and click EDIT on the right-hand side.
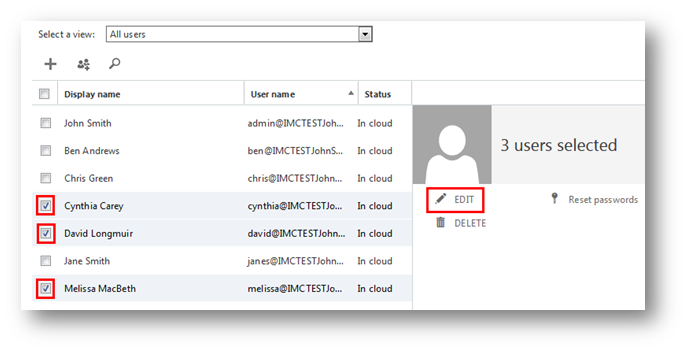
2) If there are no changes required to the profile details and settings, click Next until you see the assigned licenses page.
3) Select Replace existing license assignments or Add to existing license assignments, then select the license type to assign. Note that the license(s) you select will be assigned to all of the users you selected in step 1.
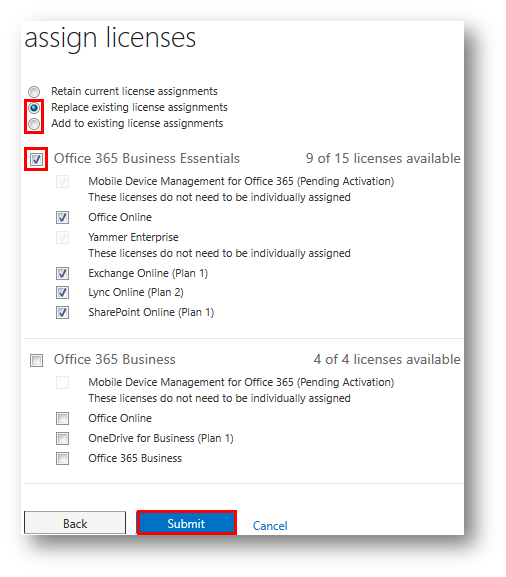
4) The results page displays the status of the changes. If they are all Complete, click Finish.
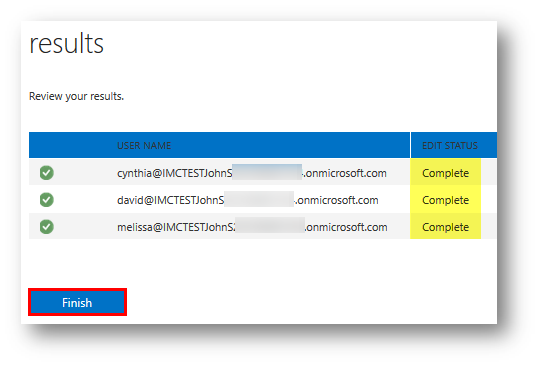
After a few moments, the new licenses will be assigned to the selected users.
How do I add seats to an existing Office 365 subscription through the customer control panel
Follow the instructions below to change the number of seats in an Office 365 subscription in the Customer Control Panel.
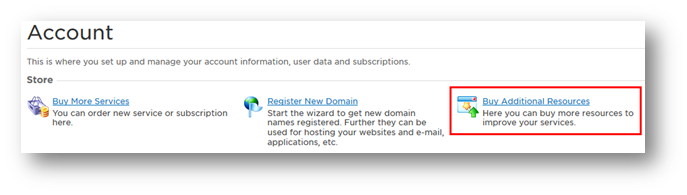
1) Log in to the customer’s Customer Control Panel.

2) Navigate to the Account tab.
3) Click Buy Additional Resources.
4) Select the O365 subscription that needs to be updated and click Next.
5) Click the + or – signs next to the number of users to increase or decrease the number of seats in the subscription.
Note: The number in the New Limit field indicates the new total number of seats.
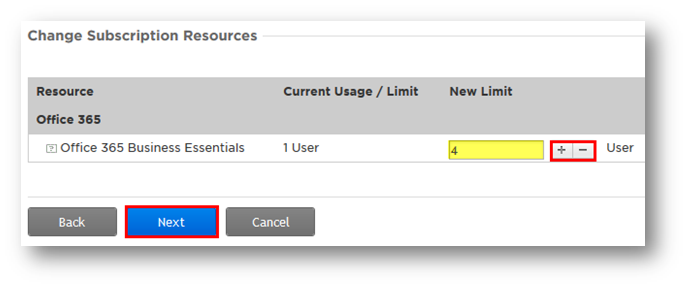
6) Click Next when the required new number of seats is displayed.
7) Confirm the order details and click Place Order.
When provisioning is complete, the new number of users will appear next to MS Licenses in the Office 365 tab.
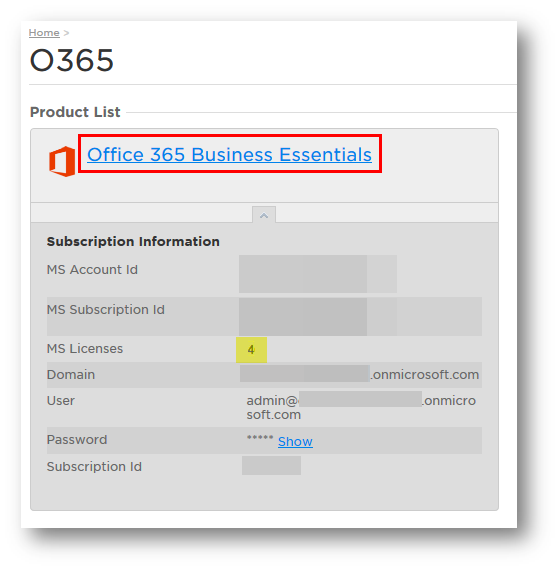
Now that additional seats have been provisioned on the subscription, they can be assigned to user profiles in the Microsoft customer-level admin portal.