
How To Add An Office 365 Service
Overview
This guide will help you get started with your myhosting Marketplace experience. Below are the steps to add a Office 365 service to your account.
These steps are for new customers and existing myhosting.com clients.
Prerequisite: Currently, you must reside in the United States to make a purchase.
How to add an Office 365 service.
New customers
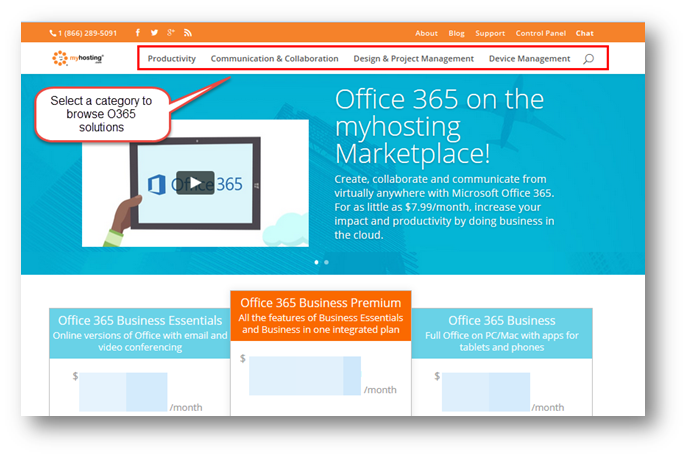
1. From the Marketplace website, select the Office 365 plan or product you wish to add.
2. Enter a unique domain that will be associated with your Microsoft service. Click to verify the address.
3. Select any additional seats you may need for each product and click continue.
4. Choose if you want to add any additional services. This includes our Lightning Email Migration tool.
5. If you click yes, the available services appear below. Click on the buy button to add.
6. Configure your Lightning Email Migration setup. This includes scheduling a call back from one of our migration experts. Choose the date and time that works best for you and include any migration notes that you feel will help. You are also able to add additional seats before continuing.
7. Register the new domain or use an existing domain.
8. Continue to the terms and conditions of the myhosting Marketplace. Review and print for your records. Accept and continue.
9. Review your order and enter account details.
10. Enter payment details.
11. Click the box to confirm that you accept the myhosting.com Marketplace privacy policy and terms.
12. Place order.
Thank you, a myhosting representative will be in touch shortly.
Existing myhosting.com clients
Please be aware that you need to create a new account. You cannot use your exisiting myhosting.com account.
1. From the Marketplace website, select the Office 365 plan or product you wish to add.
2. Enter a unique domain that will be associated with your Microsoft service. Click to verify the address. If you already have an Office 365 account, login with your credentials.
3. Select any additional seats you may need for each product and click continue.
4. Choose if you want to add any additional services. This includes our Lightning Email Migration tool.
5. If you click yes, the available services appear below. Click on the buy button to add.
6. Configure your Lightning Email Migration setup. This includes scheduling a call back from one of our migration experts. Choose the date and time that works best for you and include any migration notes that you feel will help. You are also able to add additional seats before continuing.
7. Register the new domain or use an existing domain.
8. Continue to the terms and conditions of the myhosting Marketplace. Review and print for your records. Accept and continue.
9. Review your order and enter account details.
10. Enter payment details.
11. Click the box to confirm that you accept the myhosting.com Marketplace privacy policy and terms.
12. Place order.
Thank you, a myhosting representative will be in touch shortly.